1Introduction
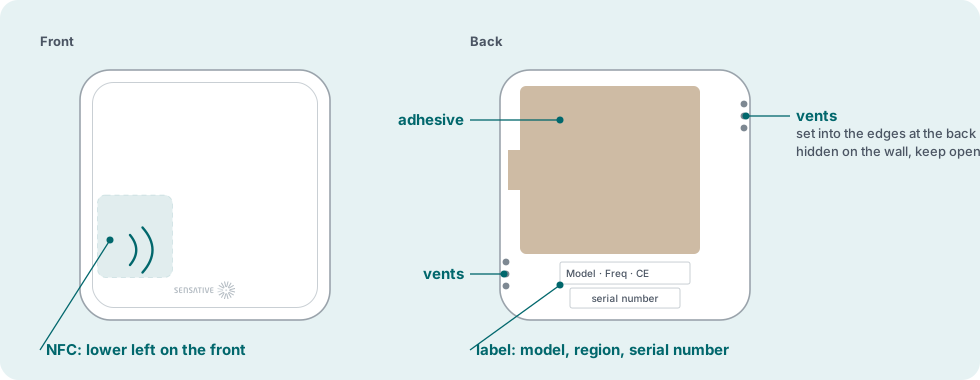
Square Comfort measures temperature and relative humidity, and reports them over LoRaWAN. It is 58 × 58 × 7 mm, with a smooth front and no visible holes: the air reaches the sensor through small, membrane-protected vents set into a recessed step at the back of the side edges, three holes at each of two diagonally opposite corners. Once the sensor is on the wall they are out of sight, and air still reaches them through the gap. It suits offices, homes, greenhouses, vehicles and sheltered outdoor spaces.
A built-in memory logs the readings while the sensor has no network, and uploads them over LoRaWAN once it is connected again, so no data is lost. Wi-Fi positioning can tell you where each sensor is. The battery is built in (750 mAh) and lasts well over ten years. For very frequent reporting there is Square Comfort L, 15 mm thick with 4,000 mAh (see the Square Comfort L manual).
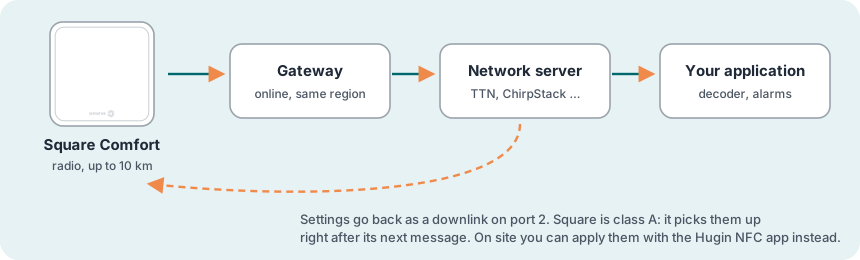
It works with any LoRaWAN network server (LoRaWAN 1.0.4, class A, OTAA) and reaches up to 10 km in line of sight. What it measures, when it reports and what it sends is decided by an application running inside the sensor, on Sensative’s Virtual Sensing Machine (VSM). This manual describes the application Square-comfort R31–R33, which can be configured, and replaced by a newer version, over the air or with NFC. Sensative can also offer alternative VSM applications for the same sensor, which give it a different task; see Which application is in the sensor.
What’s in the box
- Square Comfort, with the adhesive already on the back
The keys (DevEUI and AppKey) come with the delivery information. The Square screw mounting kit is sold separately.
Parts of the sensor
2Before you start
A LoRaWAN sensor needs a little more preparation than a sensor that pairs with a hub. Have this ready first:
You need
- A LoRaWAN gateway within range, powered on and online
- An account on a LoRaWAN network server (for example The Things Network, ChirpStack, Loriot or Actility), with the gateway added to it
- The keys for the sensor: its DevEUI and AppKey, from the delivery information. The JoinEUI is the same for all Square sensors:
70B3D52C0001D4C3. - A phone with NFC, to start the sensor. Most smartphones have it; an iPhone needs an NFC reading app (see Finding the NFC antennas).
- A payload decoder for Sensative VSM sensors in your network server or application (see Decoding the messages)
Choosing the place
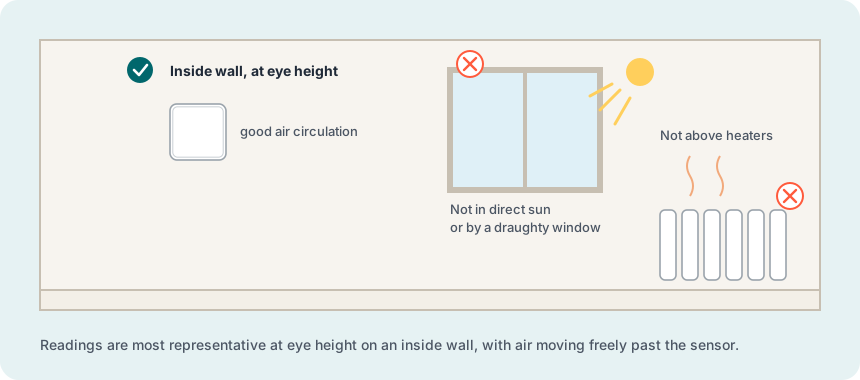
- For room climate: an inside wall at eye height, where the air moves freely past the sensor
- Away from direct sun, radiators, other heat sources and draughts
- Indoors or sheltered outdoors: the sensor is IP63
- Range: up to 10 km in open line of sight, much less through walls and floors
- Metal is fine: unlike Strips, a Square sensor can be mounted on metal without much effect on the radio. Avoid only closed metal enclosures, such as a shut steel cabinet.
Finding the NFC antennas
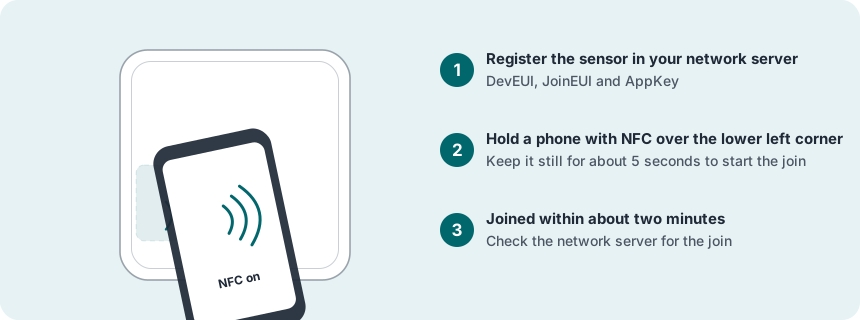
NFC only reaches a couple of centimetres, so lay the phone flat against the sensor, antenna over antenna. You need to know where both antennas are, and the easiest way to find the spot is to move the phone slowly over the right area until the phone signals contact:
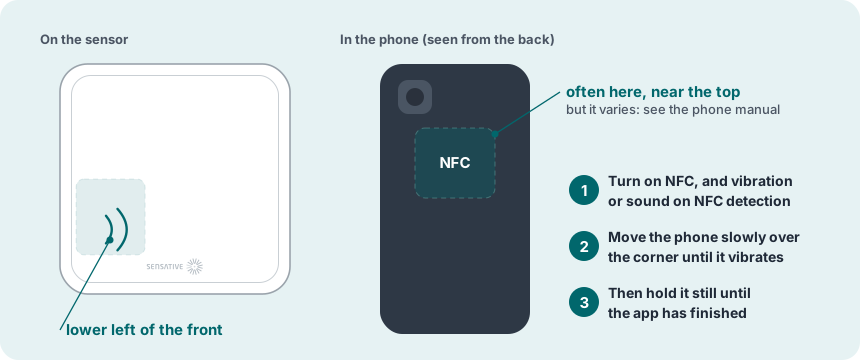
- On the sensor: at the lower left of the front, with the logo along the bottom edge.
- On an Android phone (recommended): switch NFC on, and turn on vibration or a sound for NFC in the phone’s settings, so that the phone tells you as soon as it has found the sensor. The antenna is usually on the back, near the top, often close to the camera, but it varies between models: the phone’s manual or the maker’s website shows where it is. If you cannot find it, move the back of the phone slowly over the sensor’s lower left corner until the phone vibrates.
- Take off the phone case: a protective case, especially a thick one or one with metal or a magnet, can make it hard to get NFC contact. Remove it while you work with the sensor.
- Then hold it still: to start a join, keep the phone still over the sensor for about 5 seconds. The vibration only means the phone has found the sensor. Keep the phone where it is until the sensor and the app have finished talking. With the Hugin app this takes a few seconds, because the app first unlocks the sensor through Sensative’s server. If you move away too early, the connection breaks and you have to start again.
- On an iPhone: use an NFC reading app, such as NFC Reader & Scanner from the App Store. Open it and tap its NFC button, so that it shows Ready to Scan, before you touch the sensor. The iPhone’s antenna is at the top edge of the back. Hold that edge against the sensor’s lower left corner and keep it still; when the read succeeds, a web link with the sensor’s serial number opens. The iPhone NFC join guide (PDF) shows each step with pictures.
3Step by step: from box to ready
8 steps. Register the sensor in the network server before you hold the phone to it. Then join it, check the settings, and mount it last.
Unpack
Check the sensor and find its keys. The sensor sleeps until it meets an NFC field.
Register the sensor in the network server
- Add a new end device in your network server, with activation OTAA.
- Use these LoRaWAN settings: MAC version 1.0.4, regional parameters RP002-1.0.3, max EIRP 14 dBm, and the frequency plan for your region.
- Enter the DevEUI and the AppKey from the delivery information, and the JoinEUI
70B3D52C0001D4C3. Check them carefully: one wrong character and the join fails. - Set up decoding of the messages (see Decoding the messages).
Join the network with NFC
Hold the phone over the lower left corner of the front of Square Comfort and keep it still for about 5 seconds: that starts the join (see Finding the NFC antennas, also for iPhone). The phone may show a web link with the sensor’s serial number; you do not need to open it.
Check the signal where it will sit
Put the sensor at the place where it will be mounted, and look at its messages in the network server: the join, and the first reports.
Configure (optional)
Square Comfort comes with a general-purpose comfort application. With the default settings it reports temperature when it changes by 0.5 °C, the average temperature every 60 minutes, humidity when it changes by 2 %, and alarms below 2 °C and above 60 °C. Change the settings only if you need something else, for example finer reporting or alarm levels for a cold store, or pick one of the released profiles, Indoor or Outdoor.
How to change them: see Changing the settings, the settings table and the worked examples.
Install
Choose one of two ways:
- Adhesive: the surface must be clean and dry. Peel the film off the adhesive on the back and press the sensor firmly in place.
- Screws, with the Square screw mounting kit (sold separately): two 2 mm adhesive plates on a marking foil. Use the foil to mark the drill holes, either beside the sensor or hidden behind it (then use ultra-low-profile flat-head screws). Screw the plates on with the thick adhesive side towards you, peel the films off the plates and the sensor, check the alignment, and press the sensor firmly onto the plates.
Test
Breathe on the sensor, or hold it in your hand for a minute. Temperature and humidity rise past the thresholds.
Ready
- Registered in the network server, with the JoinEUI and the right region
- Joined with NFC, and the messages are decoded
- Signal checked at the final spot: SF9 or better
- Settings checked, or changed as needed
- Mounted at eye height on an inside wall, with the vents free
- Temperature and humidity arriving
4Using the sensor
The application reads temperature and humidity at regular intervals, and sends an update when a value has changed by more than a set threshold. The settings named in bold are listed in the settings table.
Temperature
- The sensor reads the temperature every minute.
- When it has changed by more than the Temperature Threshold since the last value sent, the sensor sends the new reading.
- Every Average Temperature Interval, it sends the average temperature, whether it has changed or not.
- Above the Temperature High Alarm Level the alarm state becomes “high”, and below the Temperature Low Alarm Level it becomes “low”. The alarm is sent confirmed. If the low level is not below the high level, the alarm is off.
Humidity
- The sensor takes a humidity sample every minute.
- When the humidity has changed by more than the Humidity Threshold, it sends the new reading.
- Every Humidity Interval, it works out the average humidity, and sends it confirmed if it has changed by more than the same threshold.
Battery and position
Once a week the sensor estimates its remaining battery and sends it as a percentage. The estimate is based on the measured running time and the power used by the processor, radio, sensors and position scans. Square Comfort positions itself by Wi-Fi only. Once a day, while joined, it scans for Wi-Fi access points and sends the result. A cloud geo-solving service, such as the one in Yggio or Munin, turns the scan into a position.
Logged data
Readings taken while the sensor has no network are stored in its memory and sent over LoRaWAN when it is connected again, each with the time it was recorded. The Hugin NFC app cannot read the log out. The times come from the sensor’s clock, which it can set from the network (see Device Time Max Age in the device registers).
How Wi-Fi positioning works
- 2.4 GHz only: the radio scans only the 2.4 GHz band (2412–2484 MHz). Networks that broadcast only on 5 GHz are not seen.
- Passive: the sensor listens for nearby Wi-Fi access points (802.11 b/g/n) and records their MAC addresses and signal strength (RSSI). It does not connect to any network, needs no password and sends nothing over Wi-Fi. The addresses travel in the LoRaWAN uplink.
- How many: at least 2 access points are needed for a position, and more give a better one.
- The position: a cloud service that supports Wi-Fi positioning is needed for a position, for example Yggio (Munin and LoRa Cloud can also do this). It looks the addresses up in a database of mapped access points and returns the position.
- Accuracy: depends on how many known access points are around: typically 5–20 m indoors. With only one or two, expect the area rather than the room. Adding low-cost 2.4 GHz access points improves it.
- Wi-Fi only: Square Comfort has no satellite positioning.
Network and roaming
- Confirmed messages: alarms and average humidity are acknowledged by the network server, and the sensor sends them again if no acknowledgement arrives.
- Rejoining: if the sensor is not joined, it tries to join once every 24 hours. An NFC touch, as in step 3, starts a join attempt at once.
- Losing the network: the sensor gives the network up if it hears nothing from it for the Downlink Timeout (24 hours by default; see Device registers).
- Roaming: the sensor can be registered in up to 15 LoRaWAN networks, in priority order. Register it in each with the same DevEUI and JoinEUI, and with the last digit of the AppKey counting up:
…00for the first network,…01for the second, and so on. Then set the Roaming Network Count. If the sensor loses its network, it tries the next one in turn. Every 24 hours it goes back to trying the first. More than one network makes each join take longer and use more power. - Adaptive data rate: the sensor sets its own data rate and transmit power (sensor ADR, not the network server’s ADR), and the application damps and limits those adjustments. This suits a sensor mounted in one place, where the radio conditions change slowly.
Decoding the messages
The messages are compact binary records, and their meaning depends on the application version. Decode them with a VSM-aware decoder:
- Yggio decodes them with its built-in VSM translator, and keeps track of each sensor’s application version.
- Other platforms: use Munin, Sensative’s open-source MQTT client. It decodes the messages for any network server, keeps the device state the decoder needs and the device time up to date, and solves Wi-Fi positions.
- Your own integration: the open-source VSM translator is the decoder that Munin uses, available as a Node package. It needs two things from you: it must be able to store at least the rulesCrc32 for each sensor between messages, and it must be kept up to date, since new application versions are released without notice. Storing the whole result of the previous message also gets logged data timed correctly.
Changing the settings
There are two ways: over the air, with downlinks from your network server, or on site with the Hugin NFC app. Both usually start in the VSM Configuration Tool, which makes the downlinks for you.
- Pick the application: by name and version, or by the rulesCrc32 from the sensor’s port 15 message (see Which application is in the sensor).
- Choose a configuration: a released profile from the Profile Library (for this application Indoor and Outdoor, see Released profiles), or Custom to set your own values. Each setting shows its description, unit and range.
- Take the result: one or more downlinks for port 2, or a single payload for port 7, in hex or base64, to send from your network server. Or a QR code to scan with the Hugin NFC app, which then writes the configuration to the sensor on site.
5The Hugin NFC app
Hugin is an optional Android app for working with the sensor on site, over NFC. It needs an Android phone with NFC and GPS, and an Yggio user account. The sensor must also be registered in Yggio with your organisation as its owner: Hugin checks this with Yggio before it lets you work with the sensor. Hold the phone to the sensor as in Finding the NFC antennas. The app then shows the serial number, the application and its version, the state (for example joined), battery, link and region information, and the DevEUI. Depending on your rights in Yggio, it can read and apply configuration profiles, including one scanned as a QR code from the VSM Configuration Tool, and update the device time and position.
Installation, sign-in, flashing and troubleshooting are in the Hugin NFC app manual.
6Maintenance and removal
Battery
The battery is built in (750 mAh) and lasts well over ten years with Sensative’s predefined configurations in a good network (SF7–SF9). Frequent reporting and a weak link shorten it.
Removing Square Comfort
Slide dental floss behind the sensor and saw gently through the adhesive.
Moving to another network server
Delete the device from the old network server and add it to the new one. The sensor’s link check then fails, it leaves the old network and joins the new one. This usually takes one to two days. With the Hugin app you can restart it at once instead (Toggle On/Off), but that also resets any custom settings.
Storage and disposal
- Store unused sensors at +10 to +30 °C.
- The sensor contains a non-replaceable lithium manganese dioxide (LiMnO₂) battery, one of the most stable lithium chemistries. Do not open the sensor, and do not puncture it or heat it above +80 °C.
- When the battery is empty, dispose of the whole sensor as a battery, for recycling. Near the end of its life the battery normally swells a little; this is expected.
7Troubleshooting
| Problem | What to do |
|---|---|
| Humidity reads too high after condensation | Water on the sensor (dew) affects the readings until it has dried. |
| Temperature reads too high or too low | Check the place: direct sun, a radiator or a draught nearby gives misleading readings. |
| No position, or a poor one | A position needs a cloud service that supports Wi-Fi positioning, for example Yggio, and enough 2.4 GHz access points that the service knows; networks on 5 GHz only are not seen. See How Wi-Fi positioning works. |
| Nothing happens when I hold the phone to it | Check that NFC is on and the phone case is off. Lay the phone flat against the lower left corner and move it slowly until it signals contact, then hold it still (see Finding the NFC antennas). |
| Join Request in the network server, but no Join Accept | Check the keys, the JoinEUI 70B3D52C0001D4C3, the LoRaWAN version (1.0.4), the regional parameters (RP002-1.0.3) and the frequency plan. In US915 and AU915, the sub-band must match the gateway. |
| Nothing at all in the network server | Check that the gateway is on and online, and that the sensor is in range and not inside a closed metal enclosure. Then start a new join with NFC, as in step 3. |
| “MIC mismatch” | The keys are wrong. Check that they belong to this sensor and are typed correctly. |
| Messages arrive, but the decoder shows no readings | The decoder has usually missed the application identity: send 00 on port 15, and check that the decoder is up to date (see Which application is in the sensor). |
| The Hugin app loses the connection | Hold the phone still until the app has finished (see Finding the NFC antennas). |
| A new setting has no effect | A downlink arrives only after the sensor’s next message, and later on a busy network (see Changing the settings). Check that it is still queued, and that it was made for the rulesCrc32 your sensor reports. |
| Messages missing or irregular | Check RSSI and SNR. The sensor may be too far from the gateway, or shut inside metal. Some channels can also be disturbed by interference on the same frequency band, for example from a nearby cellular transmitter or an RFID reader. |
8Technical reference
For integrators. The values below are for the application Square-comfort R31–R33. Other versions can differ: check the VSM application documentation or the VSM Configuration Tool for yours.
Which application is in the sensor
Right after it has joined, the sensor sends its application identity, the rulesCrc32, on port 15. The decoder uses it to pick the right translation, and you need it to make the right downlinks. For this application it is:
| Application | Square-comfort |
| Version | R31–R33 |
| rulesCrc32 | 186643291 (hex 0B1FF35B) |
If you missed the message, send 00 on port 15 and the sensor sends its identity again. The Hugin NFC app also shows the application and its version on site.
Alternative applications: besides Square-comfort, Sensative can offer other VSM applications for the same hardware. They are available in the Hugin NFC app (Android) and can also be loaded into the sensor over LoRaWAN. Ask Sensative which applications fit your use. After a change, ask for the identity with 00 on port 15 and use the documentation for that application.
LoRaWAN and ports
| LoRaWAN | MAC 1.0.4, regional parameters RP002-1.0.3, class A, OTAA, max EIRP 14 dBm |
| JoinEUI | 70B3D52C0001D4C3 (all Square and Puck sensors) |
| Port | Direction | What it carries |
|---|---|---|
| 1 | Uplink | Readings and alarms (see Messages) |
| 11 | Uplink | The same outputs in compressed form |
| 12 | Uplink | Logged data: a message stored while the sensor had no network, sent later with the time it was recorded |
| 15 | Uplink | Application identity (rulesCrc32), first thing after a join |
| 15 | Downlink | 00 asks the sensor to send its application identity again |
| 23 | Uplink | Wi-Fi scan, for positioning |
| 2 | Downlink | Settings and read requests (see Settings on port 2) |
| 2 | Uplink | The sensor’s answer: the values it now has |
| 7 | Downlink | A whole configuration in one payload (see A whole configuration on port 7) |
| 7 | Uplink | The status of that configuration: None, Applied, Error or Dirty |
Messages
Each output has an id and a scale. “Confirmed” outputs are acknowledged by the network server.
| Output | Id | Size and scale | Unit | Confirmed | Sent |
|---|---|---|---|---|---|
| temp | B0 | 2 bytes, × 0.01 | °C | No | On a change larger than the Temperature Threshold |
| averageTemp | B1 | 2 bytes, × 0.01 | °C | No | Every Average Temperature Interval |
| tempAlarm | 80 | 1 byte | 0 = no alarm, 1 = high, −1 = low | Yes | When the alarm state changes |
| humidity | B3 | 2 bytes, × 0.01 | % RH | No | On a change larger than the Humidity Threshold |
| averageHumidity | 90 | 2 bytes, × 0.01 | % RH | Yes | Every Humidity Interval, if changed by more than the Humidity Threshold |
| batteryPercent | A0 | 1 byte | % (estimated) | No | Once a week |
Settings
The defaults are the values the sensor starts with. The id is what a port 2 downlink uses. Values are sent in the steps shown: a setting in steps of 0.01 is sent as a hundred times its value.
| Setting | Name in the application | Id | What it does | Unit | Range | Default |
|---|---|---|---|---|---|---|
| Temperature Threshold | tempHysteresis | B2 | Change in temperature needed before a new reading is sent. Smaller changes are not reported, which saves battery and air time. | °C, steps of 0.01 | 0.1–127 | 0.5 |
| Average Temperature Interval | averageTempIntervalMinutes | A2 | How often the average temperature is sent. It is sent every interval, whether it has changed or not. | minutes | 2–127 | 60 |
| Temperature Low Alarm Level | tempAlarmLowLevel | A3 | Low alarm level. Must be below the high level, or the alarm is off. | °C | −50 to +70 | 2 |
| Temperature High Alarm Level | tempAlarmHighLevel | A4 | High alarm level, near the product’s highest ambient temperature by default. Must be above the low level, or the alarm is off. | °C | −50 to +80 | 60 |
| Humidity Threshold | humidityTreshold | B4 | Change in humidity needed before humidity or average humidity is sent. Above 100 it is in effect off. | % RH, steps of 0.01 | 0.1–100 | 2 |
| Humidity Interval | averageHumidityIntervalMinutes | A5 | How often the average humidity is worked out. | minutes | 1–127 | 60 |
| Roaming Network Count | roamNetworkCount | A1 | Number of LoRaWAN network identities to try in turn (see Network and roaming). | number | 1–15 | 1 |
| Max Power Index | maxPowerIndex | A8 | Highest LoRaWAN power index the sensor may use, join included. The default leaves out DR0. | index | 0–16 | 16 |
| LoRaWAN power filter factor up | powerIndexFilterFactorUp | A6 | How slowly the sensor follows its own adaptive data rate towards a slower setting. 1 = no filter, 10 = very slow. | number | 1–50 | 3 |
| LoRaWAN power filter factor down | powerIndexFilterFactorDown | A7 | The same, towards a faster setting. | number | 1–50 | 3 |
Device registers
These belong to the sensor’s firmware rather than to the application, but the application uses them and they can be changed the same way. Leave them as they are unless you have a reason.
| Register | Name | Id | What it does | Unit | Range | Default |
|---|---|---|---|---|---|---|
| Downlink Timeout | LINKCHECK_TIME | D0 | How long the sensor goes without hearing from the network before it gives the network up and becomes unjoined. Any downlink, an acknowledgement included, starts the time again. From half the time on, every uplink is sent confirmed; from 80 % on, the sensor also sends link checks of its own. 0 turns the check off. The sensor sets it back to 24 hours each time it starts. | seconds | 300–2,592,000 | 86,400 |
| TX Power Range | TX_POWER_RANGE | D8 | The power index range for fast adaptive data rate: lowest in the low byte, highest in the high byte, each 0 (the region’s best) to 16 (DR0, maximum power). Raising it costs a lot of battery. | 2 bytes | 0–65,535 | |
| Device Time Max Age | GPS_TIME_MAX_AGE | CD | How long the sensor trusts its clock. Once 80 % of this time has passed, it asks the LoRaWAN network for the time with the standard DeviceTime request (DeviceTimeReq, LoRaWAN 1.0.3 and later), which keeps the times on logged readings correct. The network server must answer DeviceTime requests. | seconds | 0–4,294,967,295 | 0 |
Released profiles
Sensative has released two ready-made configurations for this application. Pick them in the Profile Library of the VSM Configuration Tool, or send the payloads below. Settings not listed keep their defaults.
| Setting | Default | Indoor | Outdoor |
|---|---|---|---|
| Temperature Threshold | 0.5 °C | 0.2 °C | default |
| Average Temperature Interval | 60 min | 30 min | 30 min |
| Temperature Low Alarm Level | 2 °C | 15 °C | default |
| Temperature High Alarm Level | 60 °C | 26 °C | default |
| Humidity Threshold | 2 % | 1 % | default |
| Humidity Interval | 60 min | default | 30 min |
Indoor is meant for indoor use, with more frequent reporting. Outdoor is meant for outdoor use as a freeze and heat warning, and keeps the default alarm levels of 2 °C and 60 °C.
| Profile | Port 2 (hex) | Or port 7 (hex) |
|---|---|---|
| Indoor | A2 00 00 00 1E B4 00 00 00 64 A4 00 00 00 1A A3 00 00 00 0Fthen B2 00 00 00 14 | 0B 1F F3 5B 02 14 A2 00 00 00 1E B4 00 00 00 64 A4 00 00 00 1A A3 00 00 00 0F 02 05 B2 00 00 00 14 00 EA E0 32 2D |
| Outdoor | A5 00 00 00 1E A2 00 00 00 1E | 0B 1F F3 5B 02 0A A5 00 00 00 1E A2 00 00 00 1E 00 D5 65 58 64 |
Settings on port 2
A port 2 downlink is a list of records of 5 bytes each: one byte for the setting’s id, then the value as a signed 32-bit integer, most significant byte first. The value is in the setting’s own steps: a temperature threshold of 0.2 °C in steps of 0.01 is sent as 20. Negative values are written in two’s complement, so −10 becomes FF FF FF F6. The sensor applies the values and answers on port 2 with the values it now has.
Reading values
A port 2 downlink of one to four bytes is a read request: the sensor sends back the current value of each id in it.
| Port 2 downlink | The sensor answers with |
|---|---|
04 | Current air temperature, in hundredths of a degree |
05 | Current air humidity, in hundredths of a percent |
B2 | The Temperature Threshold now set (any setting id works the same way) |
A whole configuration on port 7
The VSM Configuration Tool can also pack a configuration into a single port 7 payload. It starts with the application’s CRC and ends with a checksum of the configuration (configCrc32). The sensor reports the result on port 7: None, Applied, Error or Dirty.
Worked example 1: Finer temperature reporting in an office
Report every change of 0.2 °C, and send the average every 30 minutes. Both examples were made in the VSM Configuration Tool for rulesCrc32 186643291. Send one of the payloads, port 2 or port 7, not both.
| Setting | Value | Sent as | Record |
|---|---|---|---|
| Temperature Threshold | 0.2 °C | 20 | B2 00 00 00 14 |
| Average Temperature Interval | 30 min | 30 | A2 00 00 00 1E |
| Port 2 (hex) | A2 00 00 00 1E B2 00 00 00 14 |
| Port 2 (base64) | ogAAAB6yAAAAFA== |
| Or port 7 (hex) | 0B 1F F3 5B 02 0A A2 00 00 00 1E B2 00 00 00 14 00 B7 8C 3D 81 |
Worked example 2: Alarm levels for a cold store
Alarm below −10 °C and above +30 °C. The negative value is written in two’s complement.
| Setting | Value | Sent as | Record |
|---|---|---|---|
| Temperature Low Alarm Level | −10 °C | −10 | A3 FF FF FF F6 |
| Temperature High Alarm Level | +30 °C | 30 | A4 00 00 00 1E |
| Port 2 (hex) | A4 00 00 00 1E A3 FF FF FF F6 |
| Port 2 (base64) | pAAAAB6j////9g== |
| Or port 7 (hex) | 0B 1F F3 5B 02 0A A4 00 00 00 1E A3 FF FF FF F6 00 5A AF BF CE |
9Specifications
| Sensors | Temperature, humidity |
| Temperature accuracy | ±0.2 °C |
| Humidity accuracy | ±1.8 % RH |
| Radio | LoRaWAN 1.0.4, class A, OTAA; JoinEUI 70B3D52C0001D4C3 |
| Frequency plans | EU868 · US915 · AU915 · AS923-1 · AS923-2 · KR920 · IN865 |
| Range | Up to 10 km in line of sight |
| Configuration | NFC (Android) and over the air |
| Application | VSM application Square-comfort (R31–R33) |
| Memory | Built-in data log, uploaded over LoRaWAN when the sensor connects |
| Positioning | Wi-Fi geopositioning via a cloud service |
| Battery | Built-in LiMnO2, 750 mAh, well over ten years |
| IP rating | IP63 |
| Operating temperature | −20 to +60 °C |
| Dimensions | 58 × 58 × 7 mm |
| Weight | 23 g |
| Mounting | Adhesive, or the optional Square screw mounting kit |
10Support
- VSM Configuration Tool, opened at this application: vsm-lora-config-app.service.sensative.net
- VSM application documentation for this version: github.com/Sensative/vsm-application-documentation
- Munin MQTT client and decoder (open source): github.com/Sensative/vsm-mqtt-client-open-source
- VSM translator (open source): github.com/Sensative/vsm-translator-open-source
- Hugin NFC app: Sensative Docs
- Support, FAQ and downloads: sensative.com/support
- Product page and product sheet: sensative.com/sensors/square-comfort
Sources: Sensative Docs, Square Comfort, FAQ Square & Puck and Hugin NFC application (read 24 October 2026); VSM Configuration Tool, application data for Square-comfort (read 26 October 2026); VSM application documentation on GitHub (186643291-Square-comfort); VSM translator (open source); specifications from the sensative.com product data; Wi-Fi positioning: Semtech, Wi-Fi geolocation with LoRa Edge.