1Introduction
Hugin is the Android app for working on site with Square, Puck Radar and Prism sensors. You hold the phone against a sensor and Hugin talks to it over NFC. On the phone the app is called Sensative NFC Application.
With Hugin you can:
- read the sensor’s serial number, DevEUI, LoRaWAN region, firmware and VSM application
- read and change the application’s settings, and turn the sensor off and on
- write a predefined configuration profile
- update the sensor’s time, assistance position and GNSS almanac
- flash a new VSM application or firmware
- make the radar board in Puck Radar or Prism advertise on Bluetooth, so that SweIoT Toolbox can find it.
Hugin is not the same as Munin. Munin is an MQTT client that decodes data and manages sensors over the air (see Which app for what).
2What you need
- An Android phone with NFC. The current version of Hugin does not work on iPhone. Hugin uses the phone’s location for the GNSS assistance position.
- An internet connection on the phone. Hugin checks each sensor with the Sensative server before it can talk to it.
- An Yggio user account on public.yggio.net: a username (your email address) and a password. Without it, Hugin reads basic sensor information only.
- Your sensors shared with that account. Hugin only gives access to a sensor that is shared with your account. Sensative shares the sensors you buy with your account.
- The Hugin APK file.
Your Sensative contact provides the account and the APK, and shares your sensors with the account.
3Install and sign in
Install
Copy the APK to the phone and open it. Depending on your Android version, you may have to allow installation from unknown sources.
Sign in to the image server
Start Hugin and open the Account tab. Under Image Server, check that Host is dotkeeper.sensative.net, Port is 443, and Use TLS/SSL (HTTPS) is on. If the Host and Port fields are hidden, tap the Image Server heading repeatedly until they appear.
Enter your public.yggio.net username (email) and password, and press Check.
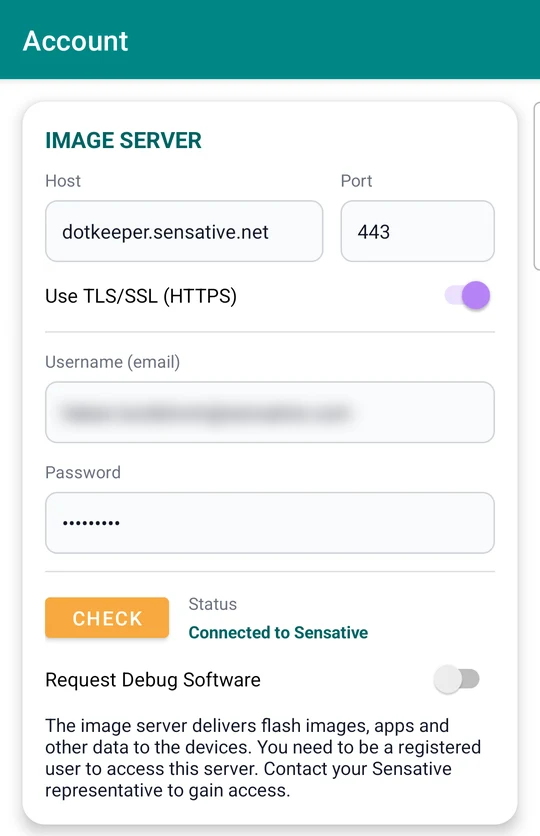
dips.service.sensative.net as the image server. If Host shows that or any other wrong address, change it to dotkeeper.sensative.net.Sign in to Yggio (optional)
The IoT Platform section on the same tab connects Hugin to Yggio, where your sensors are. Its Host is public.yggio.net by default. Enter your Yggio username and password and press Check; Status shows “Connected to Yggio”.
Hugin works without the Yggio sign-in, but with it Hugin can also:
- find the sensor in Yggio when you tap it, by DevEUI, and show its Yggio name, last-seen time and RSSI with the sensor information
- keep Yggio decoding the sensor correctly: when the application on the sensor does not match the application description on its Yggio node, for example after a reflash, Hugin writes the right one to the node
- use the application description from the Yggio node when the image server does not have one, for example for a customer-specific build; App Settings and Activate Radar Bluetooth then work for that sensor
- check and fix the sensor’s Yggio node under Advanced, Mesh Status: node name, secret (must be the serial number) and device model (must be
sensative-vsm-lora).
The sensor must be shared with your Yggio account for any of this to work. NFC App Version at the bottom of the Account tab shows which build of Hugin you have; give it to Sensative support when you report a problem.
4Connect to a sensor
The NFC antenna is in a different place on each product:
| Sensor | NFC antenna |
|---|---|
| Square (Air, Comfort, Presence, Sound, Impact, Tracker, Tracker Xtreme) | Lower left on the front |
| Puck Radar | Centre of the top, right in front of the radar |
| Prism | On the front faces, opposite the dots on the edge: one dot for unit 1, two dots for unit 2 |
The phone’s NFC antenna is on the back, and its position differs between models; the phone’s manual shows where.
Turn on NFC
Search the phone’s Settings for “NFC” and turn it on. Start Hugin and open the Home tab.
Hold the phone to the sensor
Hold the phone flat with its back against the sensor, and slide it slowly across the surface until the two antennas line up. Hold still while Hugin checks the sensor with the server; this takes a few seconds.
If anything fails or stops responding, lift the phone away and hold it against the sensor again: a new NFC connection starts a new session.
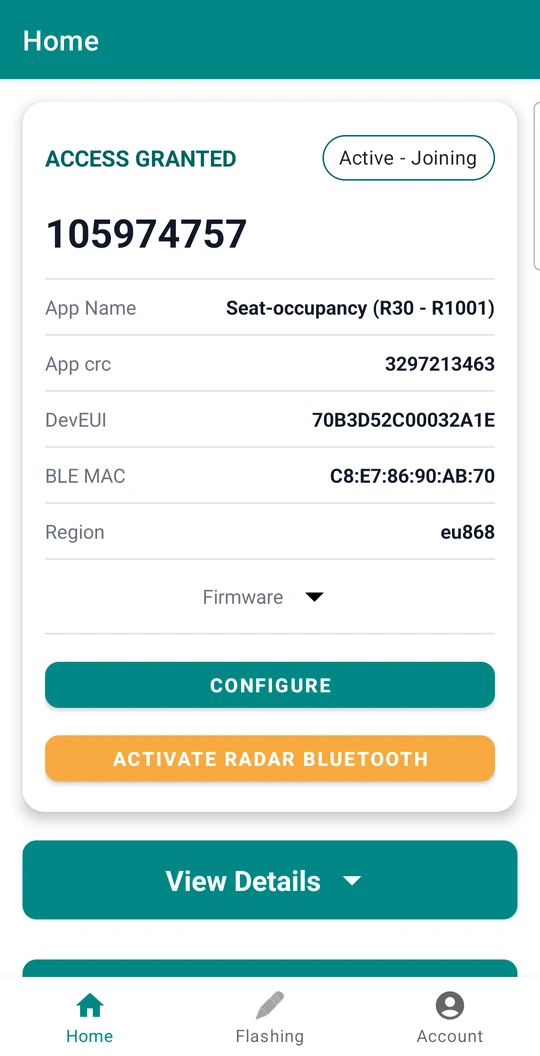
| Field | What it shows |
|---|---|
| Serial number and state | At the top. The state shows whether the sensor is joined to the network. |
| App Name | The VSM application on the sensor, for example Puck-radar. |
| App crc | Identifies the exact application build. Use it to find the matching application documentation. |
| DevEUI | The sensor’s LoRaWAN DevEUI. |
| BLE MAC | The Bluetooth address of the radar board, on Puck Radar and Prism. |
| Region | The LoRaWAN region, for example eu868 or us915. |
| Firmware | Release, build type and build time. |
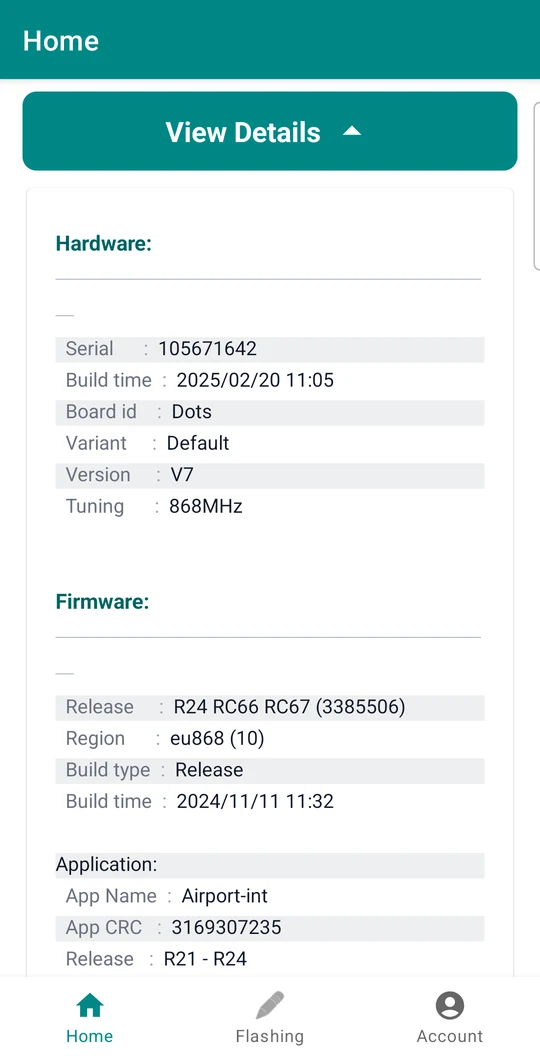
Below the fields are the Configure button, the Activate Radar Bluetooth button (sensors with a radar board only), and three sections you can expand: View Details, Profiles and Advanced. View Details shows the full sensor information:
| Block | Fields |
|---|---|
| Hardware | Serial, Build time, Board id, Variant, Version (hardware revision), Tuning (radio band, for example 868 MHz) |
| Firmware | Release, Region, Build type, Build time |
| Application | App Name, App CRC, Release |
5Change application settings
Configure opens App Settings: a list of the settings in the sensor’s VSM application, with their current values. Hugin needs your image server sign-in to read the list.
- Hold the phone against the sensor and press Configure.
- Tap a setting to change its value. Hugin writes it to the sensor.
- Press Close when you are done.
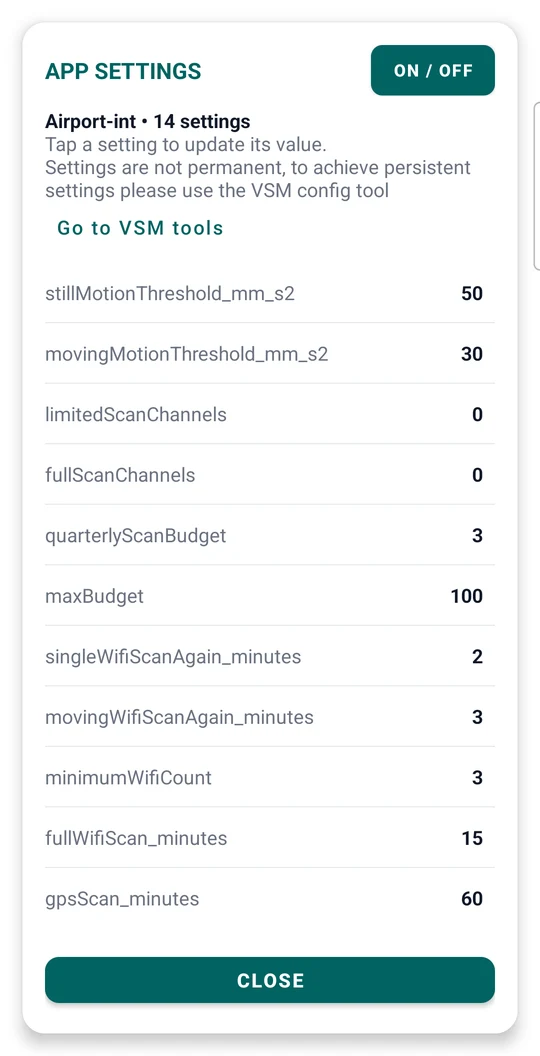
App Settings also has:
- ON / OFF turns the sensor off, or on again. Turning a sensor off and on makes it send a new join request, for example after you move it to another LoRaWAN network server. The sensor does not work while it is off.
- Go to VSM tools opens the VSM Configuration Tool, which builds configuration downlinks for sensors already in the field.
6Write a configuration profile
The Profiles section shows the sensor’s current configuration profile and lets you write a different one. The profiles are predefined sets of settings for each application, the same ones the VSM Configuration Tool offers. Current Config Profile shows the application, the profile name and its status:
| Status | Meaning |
|---|---|
| Default | No profile has been written. The sensor uses the application’s defaults. |
| Applied (unmodified) | A profile was written and nothing has changed since. |
| Modified | A profile was written and settings have been changed since, for example in App Settings or by downlink. |
| Error | The stored profile belongs to a different application or version, usually because the sensor was reflashed after it was configured. Write a new profile. |
Profiles exist only for applications that Sensative has published profiles for, and many applications have none. Hugin gets the list from the image server for the application’s App CRC. A profile made in the VSM Configuration Tool can also be sent to the phone as a QR code; Hugin lists it first, as “QR:” followed by its name. If there are no profiles for the application, or the sensor’s configuration matches none of them, the list shows Custom Profile and Write and Restart is not available; change the configuration by downlink instead.
- Expand Profiles.
- Select a profile in Select Config Profile.
- Press Write and Restart.
- Wait a few seconds for the sensor to restart, then hold the phone against it again. The restart replaces the NFC session keys, so the old connection does not continue.
7GNSS almanac, position and time
For sensors with assisted GNSS (GPS or BeiDou), such as Square Tracker Xtreme. They need:
- a GNSS almanac, valid for about three months
- an assistance position, updated when the sensor moves more than about 100 km
- the correct time.
You can keep these up to date over the air instead, without visiting the sensor: in Yggio with Almanac Fleet, or with Munin. Use Hugin when you are at the sensor anyway.
- Hold the phone against the sensor.
- Expand Advanced and select GPS Assist, Almanac & Device Time.
- Press Update GNSS Almanac.
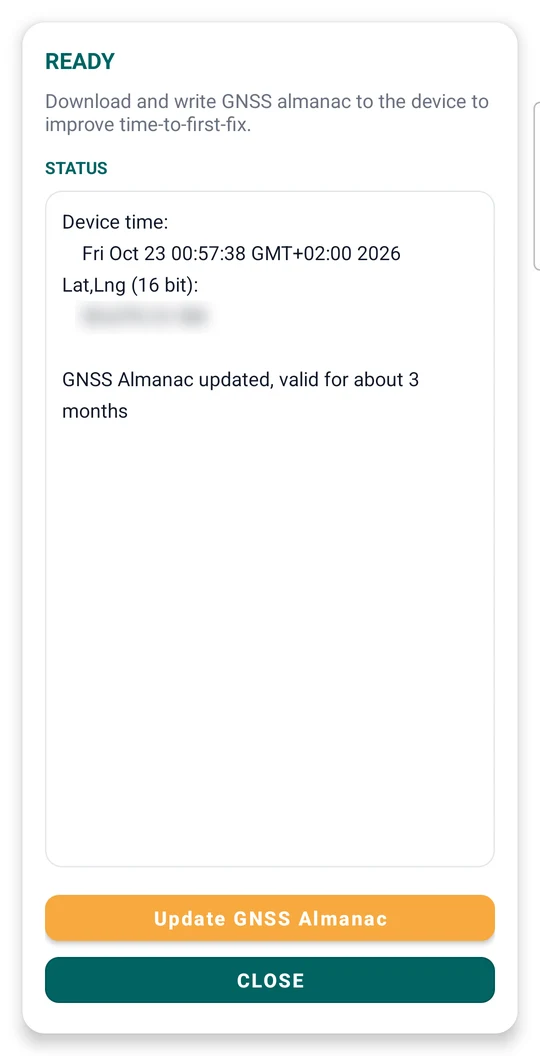
- Keep the phone in place until the title shows READY. This takes several seconds.
Hugin first writes the phone’s time and position to the sensor, then streams the new almanac (about 2.6 kB). The status box shows the device time, the position written, the almanac progress in bytes, and finally “GNSS Almanac updated, valid for about 3 months”.
8Flash an application or firmware
The Flashing tab loads new firmware and VSM applications onto the sensor. Which versions you can flash depends on your image server account. Ask your Sensative contact which application, version and region to use: not every combination has been verified on every product.
- Open the Flashing tab and check that the mode drop-down at the top shows Regular.
- Hold the phone against the sensor. Hugin shows the hardware under Device Status, then ACCESS GRANTED, and downloads the versions available for the sensor.
- Select Version first. App and Region stay greyed out until a version is selected; Image Status then shows how many applications and regions the version has, for example “Got 16 rule files and 4 regions”.
- Select the App, for example Motion-spectrum.vso, and the Region, for example eu868 or us915.
- Press Flash. It turns active once Version, App and Region are set and the status shows “Image ready”.
- Keep the phone in place until “Flash completed” appears. A VSM application takes a few seconds; firmware takes about a minute.
- Wait a few seconds for the sensor to restart, then hold the phone against it again.
- If you flashed a new application, write a configuration profile (section 6): profiles belong to a specific application and version.
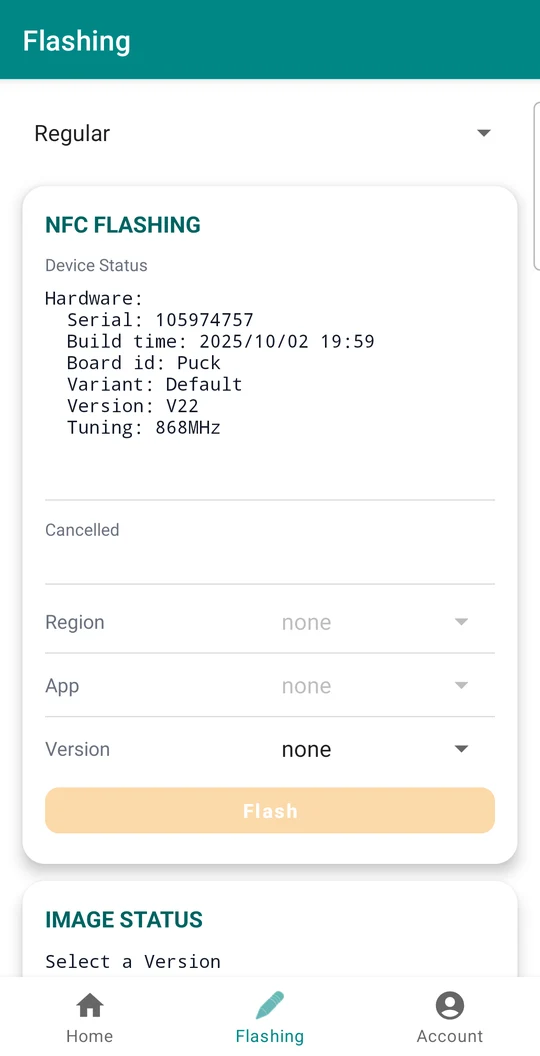
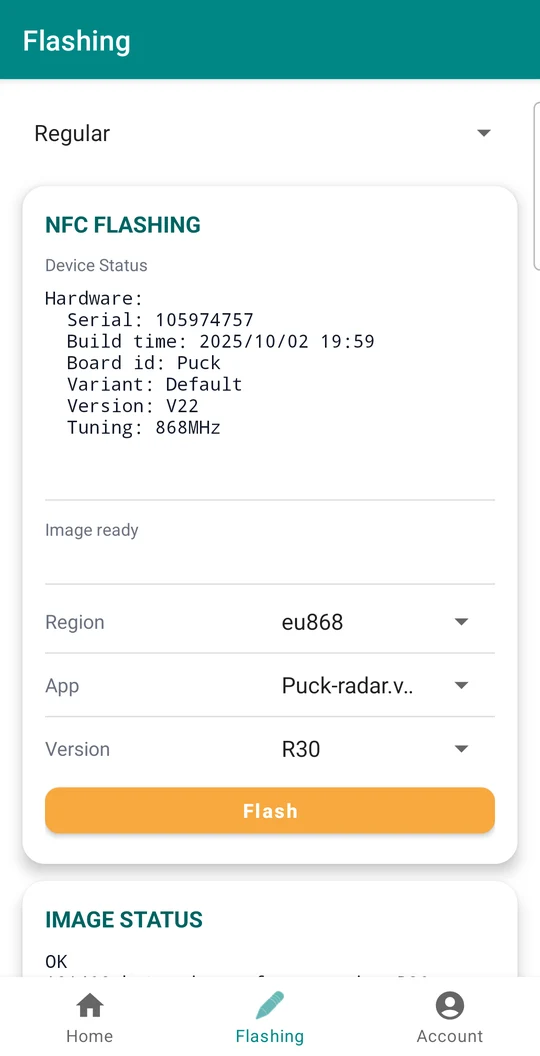
Hugin remembers the last Version, App and Region, and keeps the downloaded image. To flash the same software onto the next sensor, hold the phone against it and press Flash.
The mode drop-down has two more modes:
- Application flashes only the VSM application, not the firmware. Select Version and Application, then press Flash Application.
- Handless flashes the same selection onto many sensors in a row. Select Region, App and Version in Regular mode first, then switch to Handless and hold the phone against each sensor in turn. Flashing starts by itself.
9Advanced
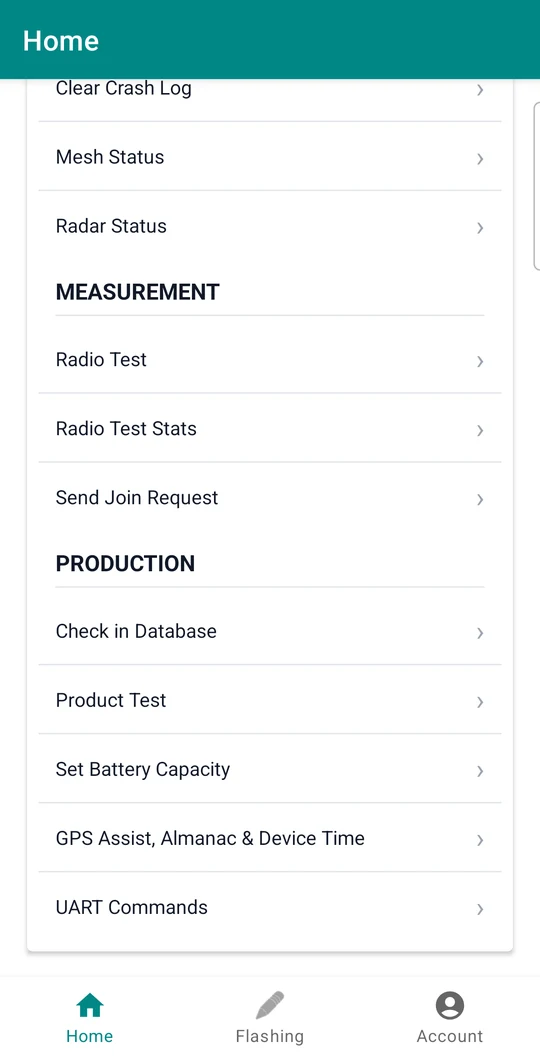
The Advanced section on the Home tab has diagnostic, measurement and production tools. The ones you are most likely to need:
| Item | What it does |
|---|---|
| GPS Assist, Almanac & Device Time | See section 7. |
| End Production Mode | Takes a sensor out of factory mode (see Questions and troubleshooting). |
| Application Info | Details of the application on the sensor. |
| Mesh Status | With the Yggio sign-in: the sensor’s Yggio node name, secret and device model, each marked OK or INCORRECT. If the secret is not the serial number, a button sets it. |
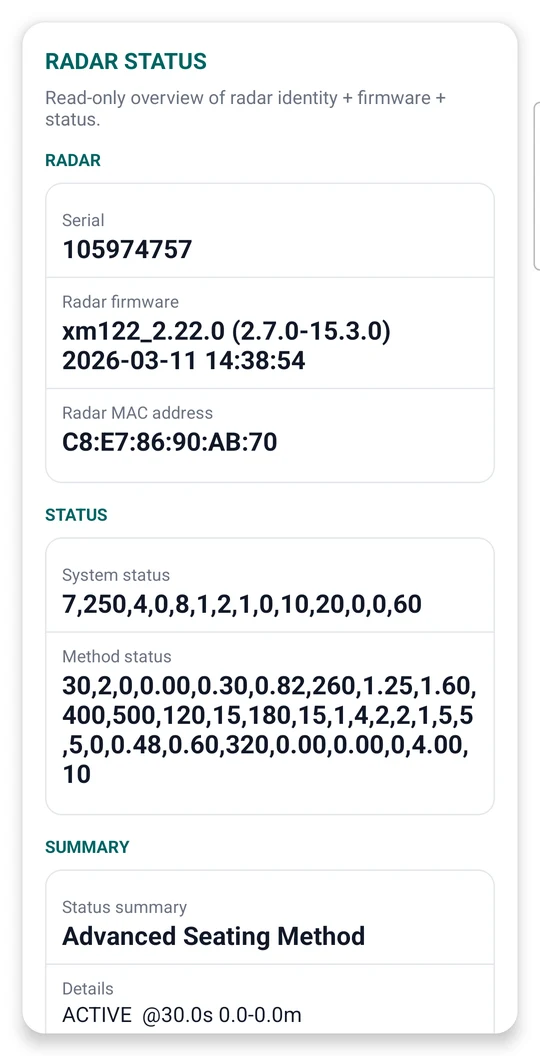
| Radar Status | Puck Radar and Prism. A read-only overview of the radar board: serial, radar firmware, Bluetooth MAC address, the raw system and method status, and a summary of the radar method in use and its state. |
| UART Commands | Sends a command to the sensor over NFC instead of by downlink. Ports 32–39 go to the LoRa application and ports 48–55 to the UART, for example port 48 for the radar board. At most 61 bytes. |
The other items (power statistics, registers and sensors, debug, crash log, radio tests, product test, battery capacity) are for Sensative support. Use them when support asks you to.
10Data, updates and accounts
Hugin logs events to the Sensative server, such as which firmware was flashed and which configuration was written to a sensor. It also collects statistics from the sensor, such as power consumption and diagnostics. The data is linked to the sensor’s serial number. By using the app you consent to this logging; you can ask Sensative to erase the collected data under the GDPR (see our privacy policy).
Sensative may update Hugin without notice, for security or other reasons. Your Sensative contact tells you when you need a new version. If your account details are compromised, Sensative may block the account temporarily.
11Questions and troubleshooting
The first thing to try for most problems is to reconnect: lift the phone away and hold it against the sensor again.
| Problem | What to do |
|---|---|
| Does Hugin work on iPhone? | No. Use an Android phone with NFC. An iPhone can start a join, but it connects less reliably than an Android phone. |
| Do I need Hugin to join a sensor to my LoRaWAN network? | No. Add the DevEUI, JoinEUI and AppKey to your network server, then hold any active NFC field against the sensor to start a join. The sensor’s manual has the steps. |
| Nothing happens when I hold the phone against the sensor | Check that NFC is on and that Hugin is open on the Home tab. Slide the phone slowly over the sensor’s antenna (section 4). The sensor’s manual has a picture of where the antenna is. |
| The Account tab shows “Check settings!” or “Failed: null” | “Check settings!” means the image server username or password is missing; “Failed: null” usually means one of them is wrong. Check that Host is dotkeeper.sensative.net and Port 443, and that your sensors are shared with your account. Sign in at public.yggio.net with the same details; if that fails too, reset the password from the Yggio sign-in page with Forgot password?, then enter the new one in Hugin. |
| Hugin is signed in but does not give access to a sensor | The sensor is not shared with your account. Sign in at public.yggio.net and check that it is listed. If not, send its serial number or DevEUI to your Sensative contact. |
| Configure shows “Failed to read application CRC” | Hugin could not look up the application on the image server. Check that the Account tab shows “Connected to”, then hold the phone against the sensor again. |
| Hugin shows “No information for app CRC” followed by a number | Hugin does not have the description of the application on the sensor: it is not signed in to the image server, or the application is not published there (customer-specific and regional builds sometimes are not). With the Yggio sign-in, Hugin uses the description on the sensor’s Yggio node instead. If the message stays, send the serial number and the App CRC to your Sensative contact; until then, configure the sensor by downlink. |
| Hugin stays on “Authorizing (factory mode)…” | The sensor is still in production mode from the factory. Expand Advanced, select End Production Mode, press Yes and keep the phone in place until it shows DONE. Then hold the phone against the sensor again. If the item is missing, ask your Sensative contact for the current build of Hugin. |
| Region and App are greyed out on the Flashing tab | Select Version first. |
| The connection dropped while flashing | The sensor is in boot mode. Hold the phone against it again and flash the same version, application and region; flashing resumes where it stopped. |
| Hugin stops responding after Write and Restart or Flash | The sensor restarts and the NFC session keys change. Wait a few seconds and hold the phone against it again. |
| The profile status shows Error | The profile was made for another application or version, usually after a reflash. Select a profile and press Write and Restart. |
| How do I move a sensor to another LoRaWAN network server? | Add it to the new network server, then make it send a new join request: press Configure, then ON / OFF to turn it off, and ON / OFF again to turn it on. |
| Which application is on my sensor? | Read App Name and App crc on the Home tab, and look up the App CRC in the VSM application documentation. |
Connecting a radar board to SweIoT Toolbox
The radar board in Puck Radar and Prism is configured with the SweIoT Toolbox app over Bluetooth, not with Hugin. SweIoT Toolbox needs its own account, and it only shows radar boards that belong to that account: a radar whose Bluetooth MAC address is not assigned to your SweIoT account is ignored, even when it is advertising.
Before the first connection, read the radar’s Bluetooth MAC address in Hugin (Advanced, Radar Status, or BLE MAC on the Home tab) and send it with the serial number to your Sensative contact, to have the radar assigned to your SweIoT account. Then:
- Hold the phone against the sensor with Hugin open.
- Press Activate Radar Bluetooth. The radar board advertises for 20 seconds by default.
- Scan for it in SweIoT Toolbox straight away. It shows the radar by its MAC address.
Activate Radar Bluetooth shows only when Hugin is signed in to the image server and knows the sensor’s application. If SweIoT Toolbox finds nothing although a generic Bluetooth scanner such as nRF Connect sees the radar, its MAC address is not assigned to your SweIoT account; send it to your Sensative contact, and when they confirm, activate Bluetooth again and scan.
12Which app for what
| App | What it does |
|---|---|
| Hugin | Android NFC app for on-site work on Square, Puck Radar and Prism: read, configure, flash, GNSS assist. |
| Munin | MQTT client that decodes sensor data and manages sensors over the air, including time, almanac and positioning. Ask your Sensative contact for access. |
| VSM Configuration Tool | Web app that builds configuration downlinks for sensors in the field. |
| SweIoT Toolbox | Android Bluetooth app for the radar board in Puck Radar and Prism, on Google Play. |
Questions about Hugin go to Sensative support; give the NFC App Version from the Account tab.