1Introduction
Strips Guard 800 is a magnetic open/close sensor. It reports in real time when a door, window, gate, cabinet or drawer opens or closes. At under 3 mm thick it fits inside the frame, where nobody sees it. It can be used indoors and in sheltered places outdoors.
It works with any certified Z-Wave controller. It supports SmartStart, so you can add it by scanning a code, as well as S2 security and firmware updates over the air. It can also join as a Z-Wave Long Range device, which reaches up to 800 m. The battery is built in and lasts well over ten years.
What's in the box
- Strips Guard 800, with the adhesive already on the back
- A magnet. It sits on the sensor in the box and keeps the sensor asleep. Later it goes on the door or window.
No tools or screws are needed. The +Clip mounting accessory is sold separately.
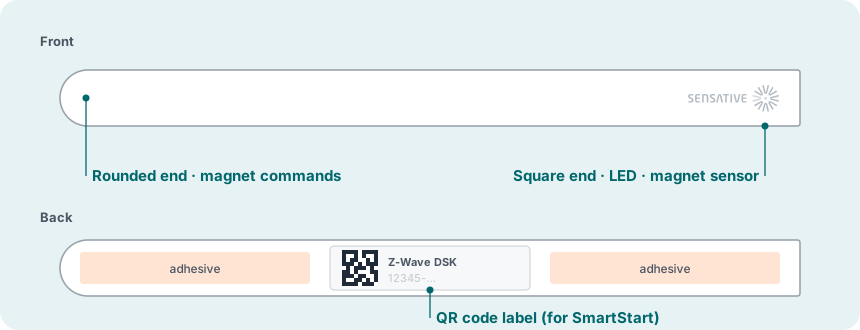
Parts of the sensor
2Before you start
You need
- A Z-Wave controller (gateway or hub) and its app, within range of where the sensor will go
- The QR code on the back of the sensor, if your controller supports SmartStart
- A small magnet for commands (wake-up, add/remove, reset) after the supplied magnet is mounted on the door. Any small, strong magnet works.
- Ordinary tape, to try the position before final mounting
Choosing the place
- Range: up to 100 m to the controller or the nearest mains-powered Z-Wave device. Every mains-powered Z-Wave device acts as a repeater and extends the network.
- No metal: do not mount Strips directly on metal or magnetic surfaces, or inside a metal structure. Metal shortens the range.
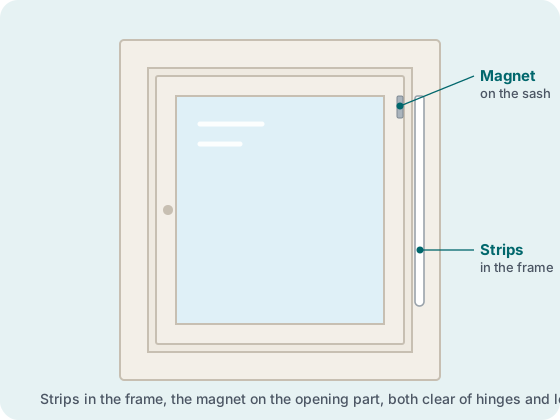
- Frame or door: Strips can go on the frame (recommended) with the magnet on the door or window, or the other way round.
- Hidden mounting: to hide Strips inside a door or window frame you need a gap of at least 3.5 mm.
- Hinges and locks: make sure neither Strips nor the magnet is in the way when the door or window opens fully.
3Step by step: from box to ready
Seven steps. Add the sensor to your network near the controller first. Then check the signal at the spot where it will go, and mount it there last.
Unpack
Check that the sensor and the magnet are there. Leave the magnet on the sensor until step 2.
Join the Z-Wave network
Choose the method your controller supports.
A · SmartStart (recommended)
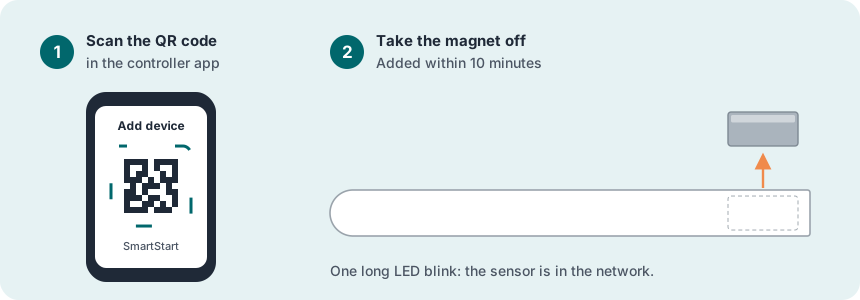
- In the controller app, choose SmartStart (or "add with QR code").
- Scan the QR code on the back of Strips.
- Take the magnet off Strips.
SmartStart begins 30 seconds after the magnet comes off. The sensor is added within 10 minutes if it is within range of the controller.
B · Classic inclusion
- Put the controller into add/pairing mode.
- Take the magnet off Strips.
If the magnet is already off, or you are adding the sensor again, do a wake-up while the controller is in pairing mode.
C · Z-Wave Long Range
If your controller supports Z-Wave Long Range, Strips can join as a Long Range device with SmartStart and reach up to 800 m. Follow method A, and choose Long Range in the controller if it asks.

Check the signal where it will sit
Hold Strips at the place where it will be mounted and do a wake-up.
Configure
Most installations work with the default settings. You change settings in the controller app. The two that are most often changed:
| Setting | Default | When to change it |
|---|---|---|
| 1 · Notification type | Access Control | If the controller does not show open/close, try 0 (binary sensor + Access Control) or 2 (Home Security). |
| 2 · LED on events | On | Set to Off if the LED should not blink when the door opens. |
All settings are listed in the technical reference.
Install
- Clean both surfaces. They must be clean, dry and at least +10 °C.
- Try the position: hold Strips in place with a piece of ordinary tape, so you can still move it.
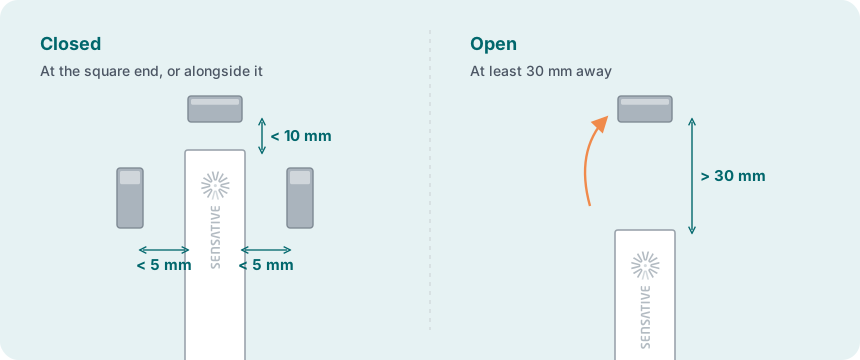
- Place the magnet opposite the square end of Strips (see the distances below). Close and open the door or window and check that the controller shows the change. Adjust if needed.
- Check fully open and fully closed: the door or window must open and close freely, and every change must reach the controller.
- Mark the position of Strips and remove the tape. Peel the film off the adhesive on the back and press Strips firmly in place, exactly on the mark. Fix the magnet the same way.
Test
Open and close the door or window a few times.
If nothing is shown, change setting 1 (Notification type). See Troubleshooting.
Ready
- Added to the controller, with S2 security if the controller supports it
- Signal checked at the final spot, with no five-blink error
- Open and close both seen in the controller
- Mounted with the final adhesive, clear of hinges and locks
4Using the sensor
What it reports
- Open / closed: sent as soon as it happens
- Tamper: sent if someone tries to wake up or manipulate Strips with a magnet
- Battery level: sent at each wake-up
If the controller cannot be reached, for example during a power cut or a lost internet connection, Strips keeps the message and tries again. It retries after 1, 2, 4, 8 minutes and so on, up to 17 hours, and then every 17 hours.
LED signals
| LED | Meaning |
|---|---|
| 1 short blink | Feedback during a magnet command, a report sent, or the sensor added to a network |
| 2 short blinks | The sensor is not added to a network |
| 1 long blink | A command succeeded (for example added, or reset) |
| 5 short blinks | Error: no contact with the controller |
5Magnet commands
You give commands by moving a magnet at the rounded end of Strips. Before mounting, use the magnet that came with Strips. Once that magnet is on the door, any small magnet works.
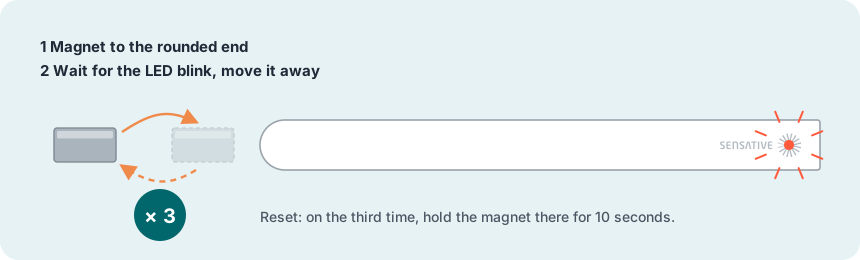
| Command | How | Confirmation |
|---|---|---|
| Wake up | Magnet to the rounded end, wait for the blink, move it away. Three times in total. | A final short blink |
| Add / remove | Put the controller into add or remove mode, then do a wake-up. | One long blink |
| Factory reset | As a wake-up, but on the third time hold the magnet at the rounded end for 10 seconds. | One long blink. It can take 10–15 seconds to come. |
Reset Strips if its controller is missing or no longer answers. After a reset, Strips must be added again.
6Maintenance and removal
Battery
The battery is built in and lasts well over ten years. It cannot be replaced. To get the most out of it:
- Mount Strips away from metal and not too far from the controller or a repeater
- Keep the default reporting settings
- Set the wake-up interval to 12 hours or more, if your controller lets you
- Run a network heal or repair in the controller after you change the network
In the cold, the battery level can read lower than it really is. This is expected: the reading takes the temperature into account and does not show the real charge.
The battery is a lithium manganese dioxide (LiMnO₂) cell, one of the most stable lithium chemistries. Do not open the sensor, and do not puncture it or heat it above +80 °C. When the battery is empty, dispose of the whole sensor as a battery, for recycling. Near the end of its life the battery normally swells a little; this is expected.
Removing Strips
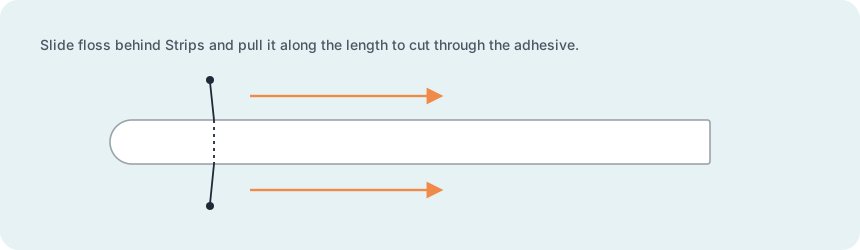
Use dental floss or a thin string.
Moving to another controller
Remove Strips from the old controller (remove mode + wake-up), or do a factory reset. Then add it to the new one.
7Troubleshooting
| Problem | What to do |
|---|---|
| Five blinks when adding | Add the sensor close to the controller, with a clear line of sight. Check that the controller is online. Strips may still belong to another network: do a factory reset and try again. Check that the region on the label (EU, US …) matches your controller. |
| Added, but no open/close updates | Change setting 1 (Notification type) to 0 or 2. If that does not help, reset the sensor, remove it from the controller and add it again. |
| Added as non-secure instead of S2 | Remove it from the controller, reset the sensor and add it again with a clear line of sight. It may take a few attempts. |
| Shows up as another device type | Check that the controller has the Strips driver installed. Drivers for 700-series Strips also work for the 800 series, and the sensor may appear as a 700. If it still shows wrongly, remove it, reset it and add it again. |
| New settings have no effect | Settings are applied at the next wake-up (every 12 hours by default). Do a wake-up to apply them now. |
| Messages arrive irregularly | Check that Strips is not on metal and not too far from the controller. Add a repeater if needed. |
| No long blink after a reset | Wait 10–15 seconds, as it can take a while. If it still does not come, contact support. |
| The LED does not react to the magnet at all | The battery may be empty. Check the last battery level the controller received. The battery cannot be replaced, so an empty sensor has to be replaced. If the battery level was fine, contact Sensative support. |
| Low battery level after time in the cold | Expected. The reading is temperature-dependent and does not show the real charge. |
Which features work depends on the controller. Some controllers support Strips fully, some only partly.
8Technical reference
For integrators and advanced users.
Configuration parameters
| No. | Name | Size | Values | Default |
|---|---|---|---|---|
| 1 | Notification type for open/close | 1 byte | 0: Binary Sensor Report + Notification Report (Access Control) 1: Notification Report (Access Control) 2: Notification Report (Home Security) | 1 |
| 2 | LED on events (e.g. alarms) | 1 byte | 0: Off 1: On | 1 |
| 15 | Supervision: events that require confirmation from the controller | 1 byte | 0: S2 encapsulation only 1: Door-open alarm only (S2 + Supervision) 2: All unsolicited reports — open/close, tamper clear, wake-up notification, battery (S2 + Supervision) | 1 |
| 22 | Advanced configuration | 1 byte | 0: Standard — fixes #1 = 1, #15 = 1, #16 = 10000, #17 = Sensative standard (retries with increasing intervals until reconnected), #18 = 0, #19 = Off 1: Enables parameters 16–19, with #1 = 2 and #15 = 2 | 0 |
Only used when parameter 22 = 1:
| No. | Name | Size | Values | Default |
|---|---|---|---|---|
| 16 | Supervision wait time | 2 bytes | 500–30000 ms | 10000 ms |
| 17 | Retries for a failed event | 1 byte | 0–5 | 1 |
| 18 | Minimum time between retries | 1 byte | 1–60 s | 6 s |
| 19 | Heartbeat: minutes between battery reports | 1 byte | 5–70 min, in steps of 5 (other values are rounded up) | 70 min |
Notification events
| Type | Event | When |
|---|---|---|
| Access Control (0x06) | Door Open (0x16) | Parameter 1 = 0 or 1 |
| Access Control (0x06) | Door Close (0x17) | Parameter 1 = 0 or 1 |
| Home Security (0x07) | Intrusion, unknown location (0x02), i.e. door open | Parameter 1 = 2 |
| Home Security (0x07) | Magnetic field interference detected (0x0B) | Tamper: someone tries to wake up or manipulate Strips |
| Home Security (0x07) | Clear notification (0x00) | The events above are cleared |
| System (0x09) | Software failure, manufacturer code (0x04) | After a software failure; the device reboots |
Association groups
| Group | Name | Max nodes | Commands |
|---|---|---|---|
| 1 | Lifeline | 1 | Notification Report, Battery Report, Binary Sensor Report, Device Reset Locally Notification, Indicator Report. Keeps the controller up to date with open/close, battery and tamper. |
Indicator
Indicator ID 0x50 (Node Identify): the LED blinks so you can find the node.
Command classes
| Command class | Version | Security |
|---|---|---|
| Application Status | 1 | None |
| Association | 2 | Highest granted |
| Association Group Info | 3 | Highest granted |
| Battery | 1 | Highest granted |
| Configuration | 4 | Highest granted |
| Device Reset Locally | 1 | Highest granted |
| Firmware Update Meta Data | 5 | Highest granted |
| Indicator | 3 | Highest granted |
| Manufacturer Specific | 2 | Highest granted |
| Multi Channel Association | 3 | Highest granted |
| Notification | 8 | Highest granted |
| Powerlevel | 1 | Highest granted |
| Security 2 | 1 | None |
| Sensor Binary | 1 | Highest granted |
| Supervision | 1 | None |
| Transport Service | 2 | None |
| Version | 3 | Highest granted |
| Wake Up | 2 | Highest granted |
| Z-Wave Plus Info | 2 | None |
9Specifications
| Sensor | Magnetic contact (open/close), tamper detection |
| Radio | Z-Wave 800 series, Z-Wave Long Range |
| Range | Up to 100 m to the nearest Z-Wave device; up to 800 m with Z-Wave Long Range |
| Security | S2, SmartStart |
| Firmware | Updates over the air |
| Battery | Built-in LiMnO2, 480 mAh, well over ten years |
| Use | Indoors and sheltered outdoors |
| IP rating | IP67 |
| Dimensions | 195 × 15 × 3 mm |
| Weight | 11 g |
| Mounting | Adhesive backing; +Clip for rough or temporary surfaces |
10Support
- Support, FAQ and downloads: sensative.com/support
- Product page and product sheet: sensative.com/sensors/strips-guard-800
- Technical support request: through the form on the support page
Source: Sensative Docs, Strips Guard 700/800 for Z-Wave Plus, Strips Z-Wave FAQ and Troubleshooting Guide (read 24 October 2026); specifications from the sensative.com product data.